 (Image generated by AI)
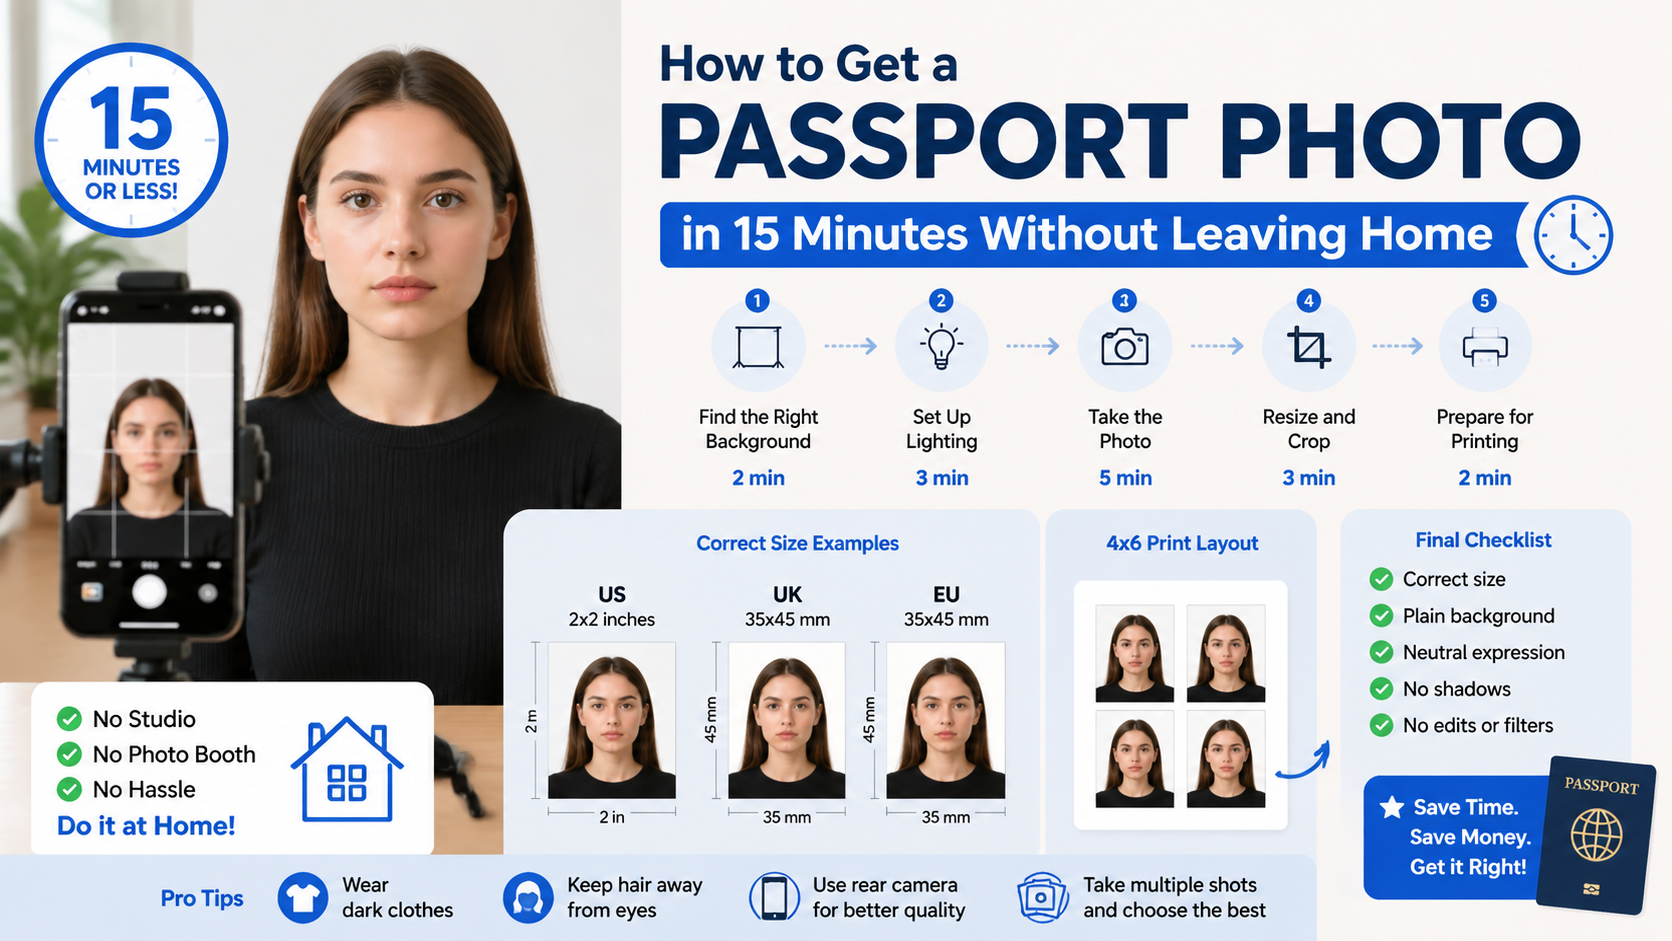
How to Get a Passport Photo in 15 Minutes Without Leaving Home
Need a passport photo fast? The good news is—you don’t need a studio, a photo booth, or even to leave your house.
With the right setup, you can create a fully compliant passport photo in just 15 minutes using your phone.
This guide shows you exactly how to do it step by step—while avoiding the most common mistakes that cause rejection.
For full rules across countries, see our Complete Passport Photo Guide.
⏱️ What You Need (Under 1 Minute Setup)
Before you start, prepare these:
- A smartphone or camera
- A plain white or light background
- Good natural lighting (window light works best)
- A friend (optional) or tripod
That’s it. No professional equipment required.
⚡ Step-by-Step: Get Your Passport Photo in 15 Minutes
Step 1: Find the Right Background (2 minutes)
Your background must be:
- Plain white or light-colored
- No shadows
- No objects or textures
A blank wall works best. If not, use a white sheet.
👉 For background rules by country, check:
Step 2: Set Up Lighting (3 minutes)
Lighting is one of the top reasons photos get rejected.
Best setup:
- Face a window (natural light)
- Avoid overhead lights (creates shadows)
- Keep lighting even on both sides of your face
🚫 Avoid:
- Shadows behind you
- Bright hotspots
- Dark or uneven lighting
Learn more: Top 7 Reasons Why Passport Photos Get Rejected
Step 3: Take the Photo (5 minutes)
Follow these rules carefully:
- Look straight at the camera
- Keep a neutral expression (no smiling)
- Eyes open, mouth closed
- Head centered
- Camera at eye level
📏 Your head should fill about 70–80% of the frame
If you’re using a phone, see: 👉 How to Take Passport Photo with iPhone
Step 4: Resize and Crop (3 minutes)
Now you need to make your photo official size, for example:
- US: 2x2 inches
- UK: 35x45 mm
- EU countries: 35x45 mm
You can:
- Manually crop (harder)
- Or use an online tool (recommended)
👉 Try: Resize Passport Photo Online Free
Step 5: Prepare for Printing (2 minutes)
Most applications require printed photos.
Instead of printing one-by-one:
- Combine multiple photos into 4x6 layout
- Save money and print easily at home
👉 Guide: How to Print Passport Photos at Home
🚨 Common Mistakes (That Ruin Your 15-Minute Plan)
Avoid these or you’ll get rejected:
- Wrong size or crop
- Shadows on face or background
- Smiling or unnatural expression
- Wearing glasses (not allowed in many countries)
- Using filters or AI editing
For detailed breakdown: 👉 Common Passport Photo Mistakes and Rejection
📸 Pro Tips (Make It Look Professional)
- Wear dark clothes (better contrast with white background)
- Keep hair away from eyes
- Use rear camera (better quality than front)
- Take multiple shots and choose the best
❓ FAQ
Can I really take a passport photo at home?
Yes. As long as it meets official requirements, home-taken photos are accepted in most countries.
Can I use my phone?
Yes. Modern smartphones are fully capable.
Do I need special software?
No—but using a tool makes it much easier and more accurate.
🚀 The Fastest Way (Recommended)
If you already have a photo with a clean white background, you don’t need to redo everything.
👉 You can simply:
- Upload your photo
- Automatically resize to correct dimensions
- Generate a 4x6 print layout
- Download instantly
Use our tool here:
👉 Best Free Passport Photo Tool (No Watermark)
✅ Final Checklist (Before You Submit)
- Correct size (2x2 or 35x45 mm)
- Plain background
- Neutral expression
- No shadows
- No edits or filters
Conclusion
Getting a passport photo in 15 minutes at home is completely doable—and often better than going to a store.
If you follow the steps above, you can create a compliant, high-quality photo without stress.
👉 Already have a white background photo?
Just use our tool to resize + generate print layout in seconds:
Best Free Passport Photo Tool (No Watermark)